FAQ (Frequently Asked Questions)
Find assistance and support through our online knowledge base of commonly asked questions about our GANZ CORTROL VMS security and video surveillance software , modules, camera support, product documentation and more.
GANZ CORTROL VMS
What versions of CORTROL are available?
CORTROL Premier is a single server, licensed version of CORTROL. Allowing the use of up to 96 video channels of analog, IP, or a mix of analog, and IP. Licenses are prepackaged in 24, 48, and 96 video channel offerings.
CORTROL Global is a multi-server, Central Managed Enterprise version of CORTROL. Offering unlimited video channel support of analog, IP, or a mix of analog, and IP.Licenses are prepackaged in 50, 100, 500, 1000, and 5000 video channel offerings.
What are the strengths of CORTROL Premier?
- Max. 96 video channels (IP, Analog through DVR)
- Max resolution supported 4k
- Unlimited instances, connections allowed, regardless client, browser, or mobile app.
- Analog/capture boards supported
- Advanced Events & Actions supported
- External Services (Mobile device streaming)
- E-maps supported
- Digital I/O’s supported
- Multicast supported
- VCA, LPR, and Facial Recognition supported
- User buttons supported
- Visual groups supported
- USB Joystick supported
- Shared Layouts supported
What are the strengths of CORTROL Global?
CORTROL Global Strengths are:
- Technically unlimited video channels (Analog, IP, or mixed)
- Max resolution supported 4k
- Unlimited instances, connections allowed, regardless client, browser, or mobile app.
- Analog/capture boards supported
- Advanced Events & Actions supported
- External Services (Mobile device streaming)
- E-maps supported
- Digital I/O’s supported
- Multicast supported
- VCA, LPR, and Facial Recognition supported
- User buttons supported
- Visual groups supported
- USB Joystick supported
- Shared Layouts supported
- Recording Server failover supported
- Archive replication/backup with in multiple servers supported
- Organizational hierarchy supported
- Active directory & LDAP supported
- Edge Recording supported
What are the prerequisites for CORTROL?
There are a number of requirements for the CBC’s software host system:
- Microsoft Windows operating system (7 SP1, 8, 8.1, 10, Server 2008 R2, Server 2012 R2)
- Both .NET Framework 3.5 SP1 and 4.5 installed
- Defragmentation should be turned OFF for storage locations
- Ports for remote connections should be allowed through firewall (default ports are 60554 for Ganz CORTROL Client and 8080 for streaming server)
- Installation and recording directories should be added to antivirus exception list so that they are not scanned or interfered with in any other manner
- For software analytics requirements, see corresponding section of the VCA manual
- For Ganz CORTROL Client application, DirectX 10+ is required along with the latest stable graphics card Drivers
Where do I download CORTROL Premier?
CORTROL Prime/Premier uses the same installation program
From your browser, go to ganzsecurity.com / Support / Resource Center / Software.
Please scroll down looking for GANZ CORTROL PRIME/PREMIER xBIT (CURRENT x.x.x.x)
Refer to “Should I download the 32bit or 64bit version of CORTROL Premier?”
Select the link and download the file to your local PC, noting the location were the file will be downloaded.
Should I download the 32bit or 64bit version of CORTROL Premier?
The requirement of CORTROL Premier 32bit versus 64bit is based on the bit version of Windows on your PC. In order to determine your version of windows, navigate to your windows control panel, and then “System”. There you can determine if your windows installation is 32bit or 64bit. Download the version of CORTROL that matches your Windows bit version.
How do I install CORTROL Premier?
- Double click on the “Ganz CORTROL Server” icon.
- Upon launch, select language, select next.
- Accept terms agreement, select next.
- Confirm installation location, select next.
- Confirm components installation, select next, select finish.
- Please refer to Ganz CORTROL Server management manual, and or CORTROL Installation video for setup
What cameras are supported by CORTROL ?
Ganz CORTROL is a leading VMS in the number of hardware devices supported: 4000+ models of network cameras and network video servers from over 100+ manufacturers — the most comprehensive choice available in the market.
Please refer to the CORTROL product page, and select from the resources options the CORTROL Supported IP Cameras link.
How do I install/add cameras to CORTROL ?
Please refer to Ganz CORTROL Server management manual, starting on page 54.
Does CORTROL support watermarking on exported video ?
Watermarking is available in Prime, Premier and Global
- Watermarking will be available for all Editions (including Prime).
- Watermarking will sign recorded data under CORTROL archive and all exported video data.
- JPEGs and AVI files will be signed automatically during export operations.
How to use DCZ keyboard buttons for switching user-defined layouts?
Summary
This post describes how to re-define DCZ keyboard buttons to make them switch VMS Client layouts.
Description
This feature requires that you have GANZ CORTROL VMS version 1.5.2 and newer installed, and can be applied either to the server computer, or dedicated client station, depending on your system configuration.
First, you need to create and save necessary camera layouts in VMS Client. (You can also add more layouts later). – select desired camera arrangement using toolbar on the top or via right-click background -> Screen Arrangement – drag and drop your cameras to fill the empty screens – when done, right-click Layouts in the Structure pane on the left and select Save Current Layout – enter a name for your layout, click OK to save
When layouts are ready, save your VMS Client state into a separate .lxd file via main menu File -> Save.
Next, create an INI file with layout configuration. (Any text editor capable of saving a non-formatted text – like Notepad or Notepad++ etc. – would do.) Remember to set file encoding to Unicode, especially if layout names contain Cyrillic or non-standard Latin symbols.
File name: Keys.ini
File structure:
[Mapping] 1=test_layout 2=another_layout
You can add up to 38 entries, each line representing a DCZ keyboard button (left to right, top to bottom). Note that key #35 cannot be re-defined (auxiliary key).
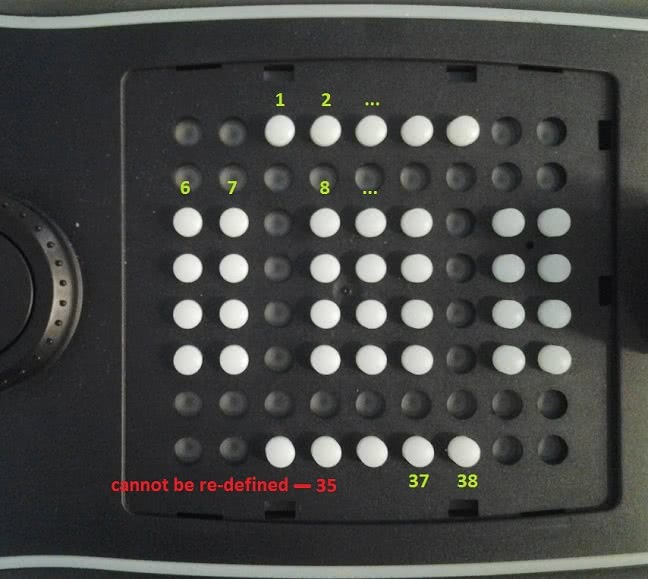
Buttons that originally have a function in CORTROL VMS Client (like Open Archive, call preset etc.) can be re-defined by assigning a layout. If such button has not been mentioned in the Keys.ini configuration, it will continue performing its original action.
Save your INI file in the CORTROL VMS installation directory. Default locations are:
C:\Program Files\CORTROL Digital Video Recorder (for 32-bit OS)
C:\Program Files (x86)\CORTROL Digital Video Recorder (for 64-bit OS)
Run your VMS Client (or restart if it was running) and make sure it is in focus – just click once inside the Client window to make it active. Now you should be able to use your DCZ keyboard to switch layouts according to the mapped buttons.
Third party software compatibility issues
Symptoms
There may be a number of compatibility issues with third party software, including the following most frequent:
- remote clients fail to connect to DVR server
- DVR server might freeze during operation
- DVR server might show poor performance
- there might be unexpected [temporary] files created while DVR server is running
Description
There has been a number of complaints of compatibility issues with particular versions of third party software, including:
- Microsoft Internet Security and Acceleration (ISA) Server
- Intel Active Management Technology (AMT) Software
- Kaspersky Anti-virus
- ESET NOD32 Antivirus
Most often the problem is related to network activity, both accessing LAN hardware such as network (IP) cameras and video servers and accessing network storage devices (NAS). Most often the problematic software package is antivirus software or software firewall. In some cases it is possible to configure third party software to avoid interference, e.g. adding exclusions on the processes and IP addresses.
In some cases, especially related to performance, it is possible to identify interfering process by checking task manager CPU load times and locating a non-DVR process that correlates in CPU load with CORTROL.exe process. That is, once DVRServer is started, the other process also start consuming significant amount of CPU time; once DVRServer is stopped, the other process also gets into close to idle state.
A symptom which points out to compatibility issue in case of freeze of DVR operation is that it is impossible to gracefully stop CORTROL Server process (service or application), or even kill it with task manager.
Resolution
In order to troubleshoot compatibility issues, it is required to disable applications suspected in compatibility conflicts. Unfortunately it appears that it is insufficient to just disable many anti-virus packages through software and it is required to uninstall in order to truely resolve compatibility conflict.
Conveniently transfer CORTROL® VMS Server settings to another server computer
Summary
CORTROL® VMS Server keeps video capture hardware settings, camera and other settings in configuration database which can be transfered to another computer when necessary or can be used to make a backup of and restore in case of crash, hardware failure etc.
Description
CORTROL® VMS Server configuration database file “Digital Video Recorder.mdb” is located in CORTROL® VMS installation directory, typically:
The configuration database contains configuration of server side objects such as cameras and recording. a backup and restore of the database may be useful to restore configured cameras if necessary, for example, in case of unexpected OS restart (caused by, for example, power outage) at the moment of writing to the database, which under certain circumstances may corrupt the database, or switch server configurations between multiple saved database files.
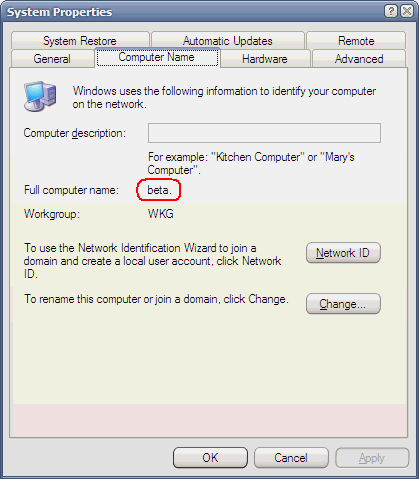
Server configuration is stored under so called instance name, which identifies CORTROL® VMS Server instance in case the database is shared between two or more CORTROL® VMS based servers. By default the instance name is the name of the computer on network (accessible through My Computer desktop icon, Properties menu item, Computer Name tab):
When the database is transfered to another computer it is required to either replace database instance name with a new computer name that hosts CORTROL® VMS Server software or specify instance name explicitly (override the default) via registry. Otherwise CORTROL® VMS Server will be unable to find its settings and create new default settings (that is based on local hardware with no remote LAN cameras).
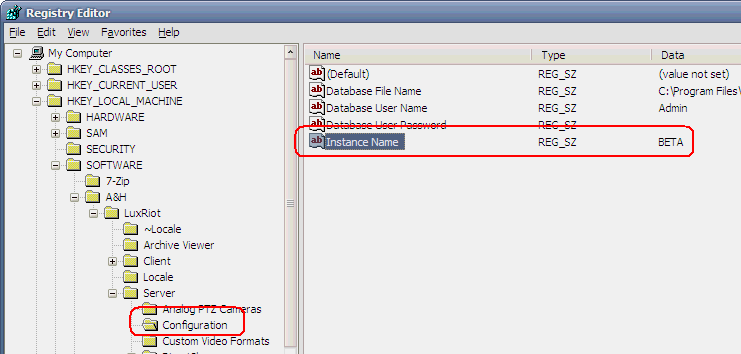
To override instance name via registry is is required to open registry editor at the key
HKEY_LOCAL_MACHINE\SOFTWARE\CBC\Cortrol\Server\Configuration (for 32-bit OS)
and edit value “Instance Name” (create new if it does not exist) and specify instance name of CORTROL® VMS Server where the configuration is copied/moved from (that is computer name of this server or registry value if specified as a registry override).
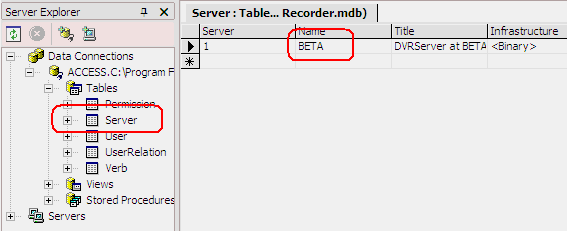
To replace database instance name in the database it is required to open or otherwise access the database using MS Access or a similar tool and edit field Name in Server table.
Once instance name is updated, CORTROL® VMS Server on next startup will use transferred or restored configuration settings.
Blackness instead of live video
Symptoms
You cannot view live video from cameras, but you can record it. Also you can see and record video from another machine (with different hardware configuration) without “Black screen” problem.
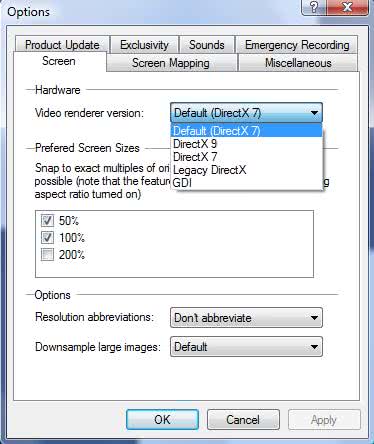
To troubleshoot this issue you should select GDI renderer in client application settings (menu Tools, Options, Screen tab) and check if issue is gone. Please remember that you should restart client application every time when you change video renderer settings in order to apply changes. Also remember that GDI mode is primarily for compatibility/reference purposes only, this mode turn off any hardware acceleration for video rendering, what results in significant performance degradation.
Resolution
This problem usually appears, when video adapter drivers aren’t fully compatible with the DirectX (actually with Direct Show). To resolve the problem you should try to install latest available drivers for the video adapter, and/or choose alternative renderer version (another DirectX version or GDI) to be used by CORTROL VMS for video rendering.
Conveniently start two instances of CORTROL® VMS Client on dual monitor systems
Summary
CORTROL® VMS Client application saves and restores it’s position on the screen to make its use convenient when however single instance of the application is used. On dual monitor systems it is sometimes convenient to have two instances to run independently, for example, one instance is persistently running on secondary monitor and the other is started on demand on primary monitor.
CORTROL® VMS Client accepts a command line switch /InstanceNumber which allows to store window positions independently between different instances.
Description
To be able to use separate instances conveniently, a shell shortcut (desktop, quick launch etc.) and CORTROL® VMS Client configuration file (*.lxd) are to be created for each instance. First, prepare configuration files creating a copy of the file or using File, Save As menu command in the application. For example, use Save As to create Primary.lxd and Secondary.lxd files under My Documents. Initially the files may be equal, it will be possible to customize the files later, such as for example configure startup layout.
Second, create shell shortcuts to start CORTROL® VMS Client using specified instance number and configuration file. Use shell context menus (e.g. in Windows Explorer) to create a shortcut. The command line for the first shortcut will be (provided CORTROL® VMS is installed into C:\Program Files\Cortrol Digital Video Recorder directory, Windows user name is John Doe and path to My Documents direcory may depend on operating system):
“C:\Program Files\Cortrol Digital Video Recorder\DVRClient.exe” “C:\Documents and Settings\John Doe\My Documents\Primary.lxd”
The second shortcut will be:
“C:\Program Files\Cortrol Digital Video Recorder\DVRClient.exe” /InstanceNumber:2 “C:\Documents and Settings\John Doe\My Documents\Secondary.lxd”
The /InstanceNumber:2 parameter instructs to use independent settings to avoid confusion with another instance. First shortcut will open client application with Primary.lxd configuration file and the second – with Secondary.lxd. Put application windows into desired positions on the virtual desktop (for example, drag second window to secondary monitor) and all window positions will be saved independently. Some of the settings (such as under menu Tools, Options) will remain be shared between the instances.
Improve performance when receiving large images (typically 2 megapixels and larger) from network cameras
Summary
Large images from network cameras may be downsampled (reduced in size) before showing on the screen to improve system performance with no or minor impact on image quality.
Description
Network camera sometimes deliver large images (2 megapixels and greater) which are shown on the screen essentially reduced in size, for instance, 2048 x 1536 image (3 megapixels) displayed on 1280 x 1024 display in layout with 4 screens is reduced almost 4 times vertically and horizontally.
Depending on video adapter and its settings, this may create unnecessary load on system which can be reduced (in some cases significantly reduced) by pre-processing images received from camera.
Instructions
Change a setting “Downsample large images” in client application menu Tools, Options as shown below:
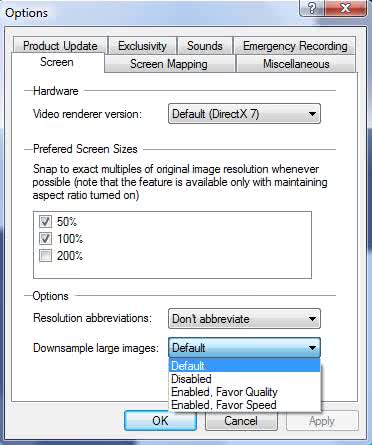
Settings “Enabled, Favor Quality” and “Enabled, Favor Speed” enable the feature. Note that the change has effect with reactivating broadcast from camera. Reconnect to server or restart application to make sure the change has effect.
Low frame rate of Arecont Vision network cameras
Symptoms
Under certain circumstances Arecont Vision network cameras may produce low frame rate (FPS).
Resolution
Typical low frame rate issues and workarounds for Arecont Vision network cameras are:
- Arecont Vision network cameras are not designed for concurrent access. So frame rate will slow down dramatically if two or more users are watching video from the same camera at the same time. Beside this Arecont Vision Network Camera Search Wizard in CORTROL will not find the camera if this camera already transmits video to some user.
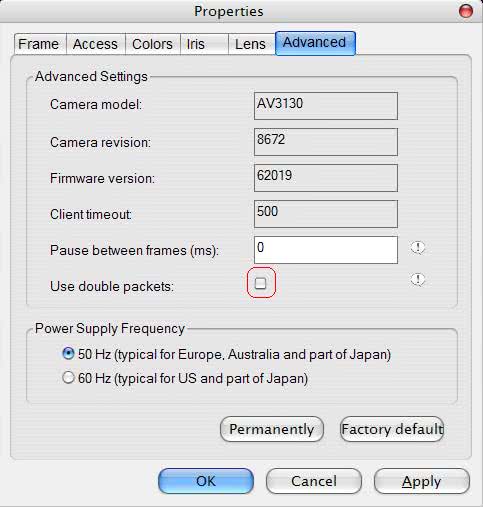
- Arecont Vision megapixel camera consumes large traffic while operating, e.g. AV 3130 camera in max quality mode consumes approx. 20Mbps. Certain network equipment have been noticed to create image transmission problems or slow down frame rate. For example, 3Com routers are not recommended. To bypass network transmission problem try to disable “use double packets” (Advanced tab). This feature specifies whether to use data packets with 2KB instead of the regular 1KB for image transmission (by default, 2KB). This allows increasing image transmission bandwidth, but may lead to a less stable performance on overloaded networks.
How to submit a problem report from machine not connected to Internet?
The Problem Report Wizard (can be started from Start Menu –> Programs –> Cortrol Digital Video Recorder –> Tools –> Problem Report Wizard shortcut, or from CORTROL® VMS Client menu) gathers information about past CORTROL® VMS errors and system and submits it to GANZ website automatically.
When CORTROL® VMS is running on machine which is not connected to internet, it is still possible to compose the report so that it can be copied to machine with Internet connection and submitted manually.
To create report, start Problem Report Wizard (shortcut location mentioned above) and pass it up to the page “Report Text – Review prepared report text“, see screenshot below.
The page provides “Drag to Copy” link which needs to be dragged using mouse to email client application, file manager application such as Windows Explorer etc. When dropped, a new file with .ZIP extension will appear. Send this file via email support@cbceurope.com to GANZ® VMS support.
How do I confirm watermarking on exported video from CORTROL ?
Watermarking is available in Prime, Premier and Global
From the windows menu, select programs, and scroll down to the CORTROL listing.
In the CORTROL listing select Ganz CORTROL Watermark Validator.
Drag exported video and drop it onto the watermark validator.
Does CORTROL support Date & Time Stamp on exported video ?
Date & Time Stamp is available in Prime, Premier and Global
Date & Time Stamp will be available for all Editions (including Prime).
Date & Time Stamp will be recorded data under CORTROL archive and all exported video data.
From Windows media player, select dropdown menu “Tools/Lyrics, captions, and subtitles”. Select “On if available”.
Does CORTROL support E-maps ?
E-maps is available in Premier and Global
- Premier: E-maps is available within each Premier Stand-alone server.
- Global: E-maps is available centrally with in Global, but can be pushed to connected clients.
Does CORTROL support email notifications ?
Email notification support is available in CORTROL Premier and Global.
Does CORTROL support SMS notifications ?
SMS notifications are not directly supported in CORTROL Prime, Premier, or Global
As an indirect way of getting an SMS notification, please try the following;
To send SMS by way of an email, address email to cell#@ISP. “Cell#” should be the cellular number you wish to send the SMS to, and “ISP”, should be your cellular provider.
Example: 2223436565@txt.att.net, or 222343656@vtext.com.
Please see below for most ISP addressing.
- AT&T – cellnumber@txt.att.net
- Verizon – cellnumber@vtext.com
- T-Mobile – cellnumber@tmomail.net
- Sprint PCS – cellnumber@messaging.sprintpcs.com
- Virgin Mobile – cellnumber@vmobl.com
- US Cellular – cellnumber@email.uscc.net
- Boost – cellnumber@myboostmobile.com
- Alltel – cellnumber@message.alltel.com
What do I do if I'm having issues connecting with cameras ?
When there is a connection issue to a camera, it is either software based, example incorrect IP address, or hardware based, example cable is disconnected.
Please follow proper trouble shooting guides to determine which is at fault, software, or hardware.
1. Start by confirming if the camera is accessible from outside of the CORTROL software.
a. Try to connect to the camera, by way of a browser.
- Confirm if you can connect to it.
- Confirm if you can view the video.
- Confirm if there have been any changes to the camera, like a new IP address.
b. Confirm the physical connections to the camera.
- Is the camera getting power?
- Are all the cables connected?
- Are all the routers, and or switches working?
2. If everything on the camera side appears good, take a closer look at the server side.
a. Temporarily turn off any firewall software running on the server/pc.
b. Temporarily turn off any suite security suite software on the server/pc.
3. Confirm the configuration from the CORTROL side of things.
a. Is the camera correctly configured under CORTROL devices?
- Details
- Membership
- Permissions
- Network
- Channels
b. Is the camera correctly configured under Channels?
- Details
- Motion detector
- Membership
- Permissions
- Channel configuration
4. In a case were everything appears ok, but the camera is still not connecting.
a. Confirm any user ID’s, and or passwords, related to camera requirement.
b. If everything looks ok, try completely removing the camera entries, and start over.
- It’s rare, but the camera entry may not have correctly entered into the device database.
How do I get a camera to record when motion is detected ?
What type of motion detection do you wish to do, camera side, or server side?
1. Camera side motion detection; The camera detects motion, and then sends the event to the server, to start recording.
a. Camera side motion detection reduces CPU load.
b. Depending on the make and model of the camera, enter the cameras setup functions.
c. Within the cameras setup functions, enable motion detection.
d. Refer to that cameras documentation, on how to setup camera side motion detection.
2. Server side motion detection; Also called software detection, the server detects motion, and then starts recording.
a. Server side motion detection creates additional CPU load.
3. Sign into the CORTROL management console.
a. Select “Channels”, then select/high light the camera of choice.
b. After selecting the camera of choice, select “Edit”
c. From the edit menu, select the “Motion detector” option.
d. From the drop down menu, select either Camera Motion Detection, or Software (High Performance)
e. Select OK, and return to the client.
How do I add a CORTROL server to CORTROL mobile ?
Determine if you have an Android based phone, or an iOS based phone. Go to the corresponding app store, and download Ganz CORTROL Mobile. Download the Ganz CORTROL Mobile manual.
1. Launch the app, and tap on “Add Server”
2. Enter the CORTROL server information. (Refer to your server installation)
3. Select “Done”
4. Tap on CORTROL server now listed under servers.
How do I change my web server ports ?
Log into CORTROL Console Management, and select “Servers”
Highlight the server in question, and then select “Edit” from options above.
Go to “Connections” and select the HTTP Port.
Change the HTTP port to the required port.
The web server port is now changed.
How do I determine what version of CORTROL I’m using ?
From the CORTROL Client application, select the “Help” menu in the top right corner. Select the “About” option. When the “About Ganz CORTROL Client Application” window appears, look for the “Product version”
From the CORTROL Console, select the three bar icon found to the right of the search option. Select the “About” option. When the “About Ganz CORTROL Console” window appears, look for the “Product version”
Launch the CORTROL server buy clicking on its icon. Look for the CORTROL server icon running in the taskbar, to the left of the clock/calendar in the lower right corner. Right mouse click on the CORTROL server icon. Select the “About” option. When the “About Ganz CORTROL Server” windows appear, look for the “Product version”.
Why can’t I connect to my CORTROL recording server ?
There are several reasons why a recording server may be reachable.
1. The server maybe offline – Confirm its status
2. Incorrect user credentials – Confirm ID/PW
3. Incorrect network address – Confirm recording server IP
4. A network firewall, or local firewall maybe preventing communications – Confirm firewall configuration
5. The local network maybe off line – Confirm the status of your local network
6. If connecting remotely;
a. The router at the recording server location maybe offline – Confirm its status
b. The router at the recording server location may not have port forwarding enabled/configured -Confirm its status.
Can I add multiple CORTROL servers to CORTROL Mobile ?
Yes, but you can only connect to one server at a time.
Where are my snapshot images saved ?
CORTROL Snapshots can be found at C:\Users\”Your user ID”\Documents\Ganz CORTROL Client Application.
Where are my exported video clips saved ?
CORTROL exported video clips can be found at C:\Users\”Your user ID”\Documents\Ganz CORTROL Client Application.
Can I view live and recorded video at the same time ?
Yes, please refer to “Instant Playback” found in the CORTROL client manual. In the live view, select the camera of interest, and then click on the arrow icon in the bottom right of the selected video channel.
How do I create Layouts ?
Custom layouts templates can be created and then used in any Ganz CORTROL Client applications connected to the target server.
To access layout templates via Ganz CORTROL Console, go to the Configuration section in the bottom left panel and select the Layout templates component in the menu on the left. Use the Search field in the upper-right-hand corner to filter existing items; press Refresh button to reload the item list.
Click the + New layout template button on the upper panel to bring up the configuration dialog box.
Enter the template name, choose grid size and then modify the grid, if desired: you can select multiple cells at once with your mouse and then use the Merge and Unmerge buttons below to create custom cell combinations. Note that you can only create rectangular regions, not just any polygonal areas. When you have finished, click the OK button; the newly created layout template will appear in the item list and it will also appear in any connected Ganz CORTROL Client applications after synchronization. Use the Edit button to alter any template at any time: modifications will immediately be synchronized with Ganz CORTROL Client after you save the changes and modified templates will be available for use. However, if the modified layout was already in use, its current output will not be altered, allowing you to save the old layout in Ganz CORTROL Client. Drag and drop the new layout template to the Ganz CORTROL Client live view display to load the updated template version.
Can I control my Pan-Tilt-Zoom (PTZ) cameras and use presets from CORTROL ?
To access the PTZ controls, left click on the video channel to which the PTZ has been assigned. This will highlight the video channel, exposing the function icons in the bottom right corner of the video channel. Left click on the PTZ function icon, to activate the overlay PTZ controls.
To pan and tilt the PTZ-capable cameras, use the overlay PTZ controls, which appear as a navigation circle onscreen. Left-click on a navigation arrow for the desired direction, and hold. By default, pan/tilt mode is enabled for PTZ cameras: notice the HUD label in the bottom-right-hand corner of live view. Selecting the HUD will cause the PTZ navigation circle to appear/disappear.
In order to zoom IN and OUT: Left click on the Zoom slider, found to the right of the PTZ navigation circle. Drag the zoom control up or down, in order to zoom in, or out.
If the PTZ camera supports it, a Focus slider will appear to the left of the PTZ navigation circle. Like the Zoom slider, left click on the Focus control, and dragging up or down to adjust the focus of the PTZ camera.
For some cameras, you may notice that the further you drag the cursor from the sphere center, the faster the camera goes: in this way, PTZ speed is controlled; however, for other cameras, only the constant speed is supported either by software or device itself, and the pan/tilt speed will remain constant no matter what position your mouse cursor is in.
How can I navigate through my recordings ?
Select Playback tab to switch to archive playback mode. Your current layout will be used and recorded video streams will be displayed for channels with enabled recording. Use the timeline and controls below to browse through recordings. For multiple camera layout, all channels will be played synchronously. Right below the video stream, timeline is displayed:
- Time intervals show timeline scale; click and drag left/right to move the timeline
- The white horizontal line shows recorded video
- The cyan line (a little bit wider than the white one) indicates motion
- The vertical line denotes current playback position
The video footage outline is shown twice: the upper outline displays the contents of the currently selected stream, with the corresponding channel name shown on the left; the lower outline shows a content summary for all the channels currently present in the viewport layout.
The playback mode controls are located at the bottom of the window:
- Far right and far left of the timeline:
o timeline start and stop timestamps
o use the <> arrows and drag left to zoom out/drag right to zoom in the timeline
o yellow arrow indicates the location of the nearest footage if it is not present on the timeline at the time (this can happen, e.g., after zooming the timeline)
- Playback controls:
o use the Play/Pause button to start playback
o use the <> arrows near the Play button to go one frame back/forward
o -/+ steps: click to go back/forward with a step of 5 seconds, 1 minute, 1 hour or 24 hours
o |< >| arrows: go to the very beginning/very end of the recording
- Playback speed:
o during playback, drag the blob to adjust playback speed from +/-0.5x to +/-32x
o the Pause button duplicates main pause control
o when paused, set playback speed to start playing video (without pressing the Play button)
- Additional controls:
o clock button: go to a specific time
o ribbon button: add a bookmark
o camera button: take a snapshot
o video button: export a piece of video
How do I add additional users to CORTROL ?
User management is accessible via the Users component of the Configuration section. By default, the system already features a built-in global Administrator account and built-in Administrators group.
Note: The built-in Administrator user account and built-in Administrators group are root users with access to absolutely all the available resources. As a result, resources choice is unavailable for the Administrators group, and it is also impossible to add Administrator user to any other group. Any users added as members to the built-in Administrators group will have the same full authority as root users.
From the Console Management, select Configuration -> Users
Add Users: Click the + New user button on the upper panel to bring up the configuration dialog box.
Select Details, and enter user login information here.
Note: Deleting a user also removes all the settings related to that user; restoring these may be timeconsuming.
Use the “enable/disable users” feature to temporarily block access for selected users.
Are there any differences between CORTROL Mobile for Android and for iOS ?
No, the GUI and functions are the same in both Android, and iOS versions.
Can I use CORTROL Mobile without a 3G/4G/LTE data plan ?
Yes, as long as you have access to a Wi-Fi network, or hot-spot.
How do I create user buttons ?
User buttons are visual controls used in Ganz CORTROL Client for manual event triggering. Once you have created a user button, it will become available in the Event & Action Configurator and you will be able to assign actions to the User button clicked event.
To access user button management via Ganz CORTROL Console, select the Configuration section from the bottom left menu and then click User buttons in the menu on the left.
Click the + New user button on the upper panel to bring up the configuration dialog box. On the Details tab, enter a name for the resource and choose organization attachment.
Switch to the Membership tab to choose groups for this user button to become a member of: select groups by double-clicking items in both columns or by using the Add/Remove buttons below.
The Permissions tab allows you to choose which users and user groups will be privileged to have access to this resource. Select at least one permission to select the user/user group; deselect by unchecking manually or using the Clear button below.
When you are finished, click OK to save and close the dialog box. The newly created user button will appear in the item list. Use the buttons on the upper panels to perform item-specific actions: remove, edit and quickly assign user button group; filters on the bottom panel will help you switch between recently created/updated items and load user buttons/button groups only.
How do I stream from my mobile device camera ?
From CORTROL Management Console, Devices, click add “New device”.
Enter a relevant device title, and then select “(Generic)
External Source” as the model.
The code required to stream from the mobile device, will appear after model selection.
Select “Ok” to save the device before you enter the code into the mobile app.
The code (under console) will replaced the hardware ID after the deice is registered, and is unique per device creation and is required for each mobile device connected to CORTROL.
From the mobile application, click “Stream” and enter the code generated for the device in CORTROL.
